This is an old revision of the document!
Table of Contents
Objective:
To gaze in awe at the power and speed of automatic differentiation, and to wonder why it took us all so long to figure this out.
Deliverable:
Tidings of joy: this should be a super simple lab!
For this lab, you will modify your code from lab3. You will swap out the numerical gradient, and you will swap in the true gradient which will be calculated via automatic differentiation.
To accomplish this, you'll use the autograd package. Other than that, the lab specs look exactly the same as lab3. They are repeated here for convenience, but just to emphasize: you should only have to change about 3 lines of code in your lab to get this to work.
You should turn in an iPython notebook that implements vanilla gradient descent on a 10-way CIFAR classifier. You should load the CIFAR-10 dataset, create a linear score function, and use the log soft-max loss function.
To optimize the parameters, you should use vanilla gradient descent.
To calculate the gradients, you should use numerical differentiation automatic differentiation.
Your code should be fully vectorized. There should only be two for loops in your code: one that iterates over steps in the gradient descent algorithm, and one that loops over parameters to compute numerical gradients.
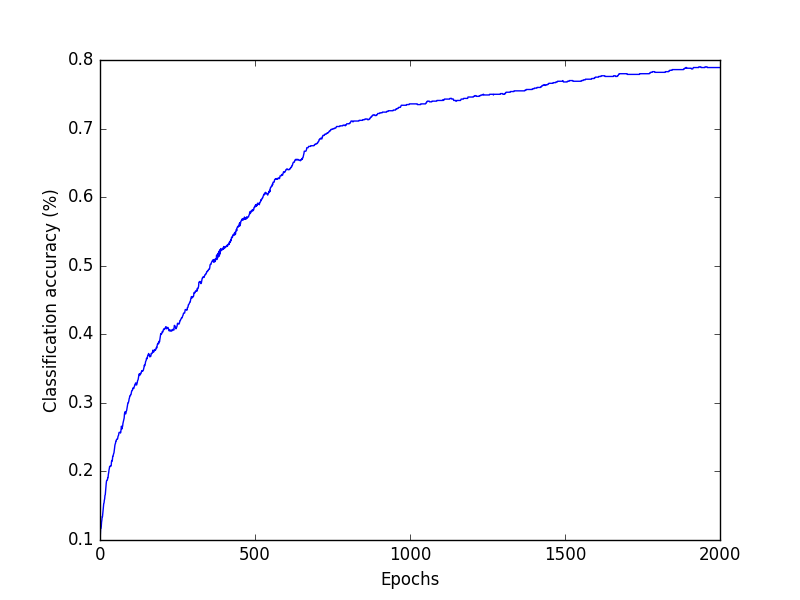
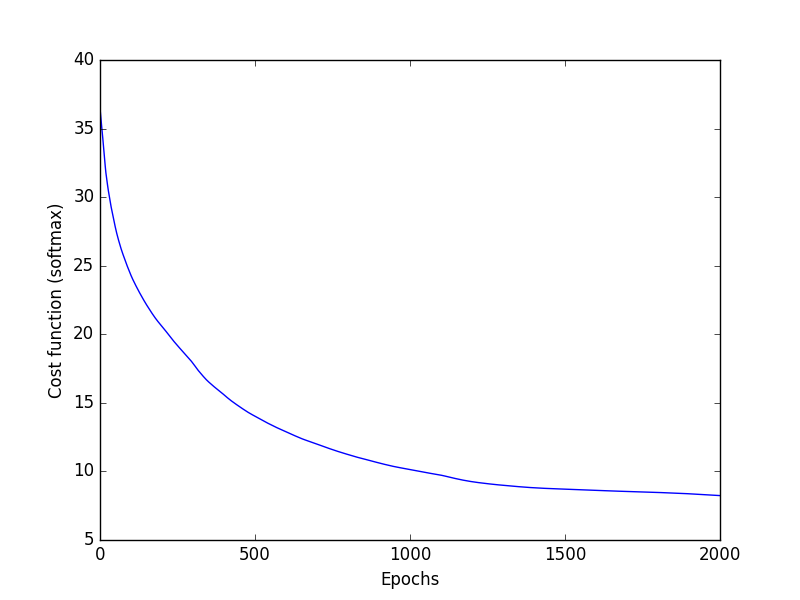
Your notebook should display two plots: classification accuracy over time, and the loss function over time. Please cleanly label your axes!
Example plots are shown at the right. Note that we're now running for 2000 epochs.
The CIFAR-10 dataset can be downloaded at https://www.cs.toronto.edu/~kriz/cifar.html
Note: make sure to download the python version of the data - it will simplify your life!
Grading standards:
Your notebook will be graded on the following:
- 80% Correct usage of automatic differentiation
- 10% Tidy and legible visualization of cost function
- 10% Tidy and legible plot of classification accuracy over time
Description:
You have now coded up a basic vanilla gradient descent optimizer, and you have calculated gradients using numerical differentiation. But you may have noticed that it is horribly, painfully slow. And the gradients you get out aren't actually that precise, anyway!
For this lab, you will change out one function: instead of calculating numerical gradients, you will use the autograd package, which will automatically calculate gradients for you. To install autograd, just run the following command (make sure you're running the pip that comes with your anaconda installation!):
pip install autograd
Very important note: You'll need to change the way you import numpy. The first two lines of your program must be the following:
import autograd.numpy as np
from autograd import grad
You can find documentation on autograd here:
So, you'll need to use the grad function from the autograd package to automatically derive a new function (let's call it grad_f), which when called will give you the gradients.
So, all you should have to do is swap out the call to numerical_gradient below, and swap in a call to grad_f. Note that grad_f will only return the gradients, not the actual value of the loss function, so you'll need to also call your loss function to compute the loss (which you'll need to generate the necessary plots):
step_size = 0.1
for i in range(0,NUM_EPOCHS):
    loss_function_value = loss_function( W )
    grad = grad_f( W )
    W = W - step_size * grad
Additional notes:
Because automatic differentiation is so much faster, we don't need to project down into a small-dimensional feature space. Please eliminate the code that randomly projects the data down into a 10-dimensional space. That means that your W matrix will also change – instead of being 10×10, it will now be 10×3072. This also means that you should be able to get higher classification accuracy!
You should run your code for 2000 epochs.
You should plot both the loss function and the classification accuracy.
Hints:
You may want to test the automatic differentiation package on known test cases - for example, f(x)=x^2.
If you get an error like FloatNode has no attribute named 'exp' , make sure you're using the autograd version of numpy!
import autograd.numpy as np
